Using Spring Tool Suite to Write a Web Flow Program
Section 1
About SpringSource Tool Suite
SpringSource Tool Suite (STS) is an Eclipse-based IDE with pre-installed plugins that provides valuable features for Spring developers. In addition to support for the core Spring framework, STS also provides visual editors, project validators, and Spring Dashboard for other projects such as Spring Roo, Grails, Groovy, Gradle, tcServer, and Spring Insight.
The main plugin for STS is Spring IDE, which provides the fundamental Spring tooling features. STS comes preconfigured with many other plugins such as M2Eclipse for Maven, Web Tools Platform (WTP), Data Tools Platform (DTP), and AspectJ Development Tools (AJDT) and JUnit tooling.
Why use STS?
- Content aware XML Spring Bean editing and refactoring
- Content-aware Spring shortcuts for Java classes
- Visualizers for graphical configuration editing
- Validators for project configuration
- Dashboard
- Spring tcServer and Insight
Getting STS
STS is available from SpringSource: http://www.springsource.com/developer/sts
STS version numbers are different than the Eclipse versions. When choosing versions from the Spring site, go the current version of STS to see the supported Eclipse versions.
When installing STS from the native installer, it prompts you to install optional products such as Spring Roo, Apache Maven, and tcServer Developer edition. If these features are already installed and configured, uncheck these products.
Already have Eclipse?
If you already have Eclipse 3.6, download the STS plugin as follows:
- Before installing STS, ensure you have the current JDK installed.
- Download the bookmarks file from: http://dist.springsource.com/release/TOOLS/composite/e3.6/bookmarks.xml.
- In Eclipse, select Preferences -> Install/Update -> Available Update Sites.
- Click the "Import…" button, select the downloaded "bookmarks. xml", and click "Open" to finish the import.
If you are using another version of Eclipse, find installation instructions here: http://www.springsource.com/products/eclipsedownloads.
Manage the plugin sites from Help > Install New Software… Clicking the "Available Sites" link shows the currently configured plugin sites.
The Dashboard
When you start STS, one of the first things you will see is the Spring Dashboard. At the bottom of this view are two tabs: Dashboard and Extensions. The Dashboard tab contains five sections:
- Create – Spring, Java, Grails & Groovy Projects
- Updates – Update information for STS
- Tutorials – Spring, Security, Web, Web Flow, WS
- Help & Docs – Forums, JIRA, STS New & Noteworthy
- Feeds - RSS announcements from Spring and Spring Blog posts
The Extensions tab contains two tabs:
- Extensions tab provides options for installing Roo, Groovy, Grails, and other useful extensions such as Google (GWT & GAE), CloudFoundry, DataNucleus, EGit, FindBugs, PMD, and more.
- The Find Updates tab checks for extension updates.

To Manage the Dashboard: Preferences > Spring > Dashboard Add Spring blogs like: http://gordondickens.com/wordpress/feed/
Section 2
Project Configuration
To take advantage of Spring tooling features, add the Spring Project Nature to each project. Then you can view the project in Spring Project Explorer and define bean config files and config sets.
If you're using Maven, you can configure this in your pom.xml file using the maven-eclipse-plugin:
<build> ... <plugin> <groupId>org.apache.maven.plugins</groupId> <artifactId>maven-eclipse-plugin</artifactId> <version>2.8</version> <configuration> <downloadSources>true</downloadSources> <downloadJavadocs>true</downloadJavadocs> <wtpversion>1.5</wtpversion> <additionalBuildcommands> <buildCommand> <name>org.springframework.ide.eclipse.core.springbuilder</ name> </buildCommand> </additionalBuildcommands> <additionalProjectnatures> <projectnature> org.springframework.ide.eclipse.core.springnature </projectnature> </additionalProjectnatures> </configuration> </plugin> ... </build> Once the Maven Eclipse plugin is installed, you can generate the Eclipse project files from the command prompt with:
mvn eclipse:eclipse 
A project configured with Spring Project Nature will have an "S" over the project, bean config files and directory icons containing bean config files.
Spring Perspective
The Spring Perspective is an Eclipse perspective displaying views such as Spring Explorer and other standard Eclipse views: Servers, Spring Explorer, Task List, Outline, Console, Markers, and Progress. This is a convenient layout that can be customized to your liking.
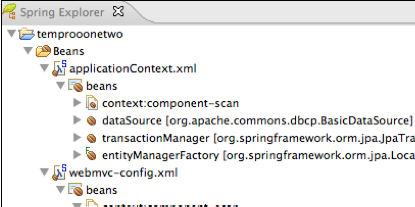
Spring Explorer View
This view provides the ability to see the Bean Config files within Spring projects. Here you can view the beans graph visualizer, create bean config files, define Bean Config sets, define new beans, validate beans, and openf MVC request mappings.
Bean Config files are XML files defining beans and bean relationships within a project. If you are using a project and don't remember where the Bean Config files are located, open Spring Explorer. Within Spring Explorer, right-click a config file and choose from several options:
- Open Dependency Graph - the visualizer for bean relationships. This is the same as the "Bean Graph" tab available in the bean editor.
- New Bean Definition - provides a dialog for entering bean definitions.
- RequestMapping - opens a view for MVC applications showing all the request mappings configured in this file. Validate - validates the bean configuration file based on the Spring Bean
- Validate - will validate the bean configuration file based on the Spring Bean validation configuration settings in preferences.
- Properties - opens project beans, validation, config set dialog. In this dialog we have the option to scan for more configuration files with the "Scan" Button.
Project Explorer View
This view provides you with the ability to look at the project by its component types such as Spring Elements, Bean Config Files, Bean Config Sets, Web Service components, Java Resources, and more.
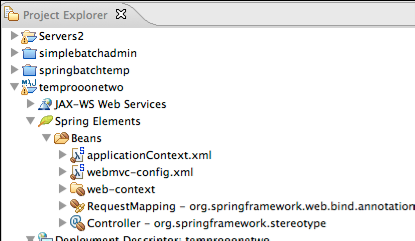
Once you have added Spring Project Nature to your project, you can create or mark bean config files.
Creating a Spring config file – From Package Explorer, click the directory for the XML file and choose:
File > New > Spring Bean Configuration File
Locating Spring config files - from Spring Explorer view, right-click the project:
Properties > Spring > Beans Support "Scan" button the directory for the XML file and choose: File > New > Spring Bean Configuration File

Bean config files will appear with the "S" over the directory and file.
Bean Config Sets
Bean config sets allow you to group bean config files together. Using Config Sets provides the ability to validate beans and bean relationships defined within multiple bean config files. Validation also provides suggestions via content assist when editing.
This feature is particularly useful when you have infrastructure beans such as dataSource defined within a test config file and the application's entity, services, etc defined in a common bean config file that is the same for all deployment platforms. You do not have the ability to assign config sets to any components or tests. This is unnecessary as STS performs cross-file validation on all config sets.
If the bean config files within a config set do not define all referenced beans, mark a config set by checking the "Is incomplete" checkbox. If checked, the BeansConfigValidator doesn't complain about missing bean references within this config set.
Spring MVC Request Mappings
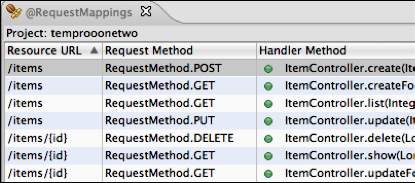
Spring MVC is very powerful and easy to configure using annotations. The MVC Request Mappings view displays the request mappings for an MVC project. In Spring Explorer, right-click an MVC project, config file, or config set and select RequestMappings to see the URL details in a tabular view. If it is not an MVC application, this view is empty. The view provides the following details:
- Resource URL
- Resource Method: GET, POST, etc.
- Handler Method
- JavaDoc
Within the view, Double click on line to go to the code.
Section 3
Starting a Project from Scratch
Spring Project
This option is extremely bare bones and only creates a basic Java project with src directory and Spring Project Nature added. No Spring dependency jars or other structures are configured. It is recommended to use the Spring Template Projects instead.
See the Spring Dashboard for quick links to create Spring, Groovy, Grails, and Spring Roo projects.
Spring Template Project
From the File > New menu, you can create a Spring project using the predefined templates from SpringSource. These templates provide a convenient starting point for different Spring projects.
The projects created from these templates are configured as Maven projects with the necessary project (JAR) dependencies.
Note: Many of the templates may require manual updating of project configuration. Updating configuration is often in two main areas: version dependencies in pom.xml and bean config file namespaces for the latest project versions.
Section 4
Bean Configuration
Bean Editing
The bean editor in STS provides features beyond a standard XML editor. In the java editor, you are already familiar with content assist. Spring adds content assist when typing in bean declarations. For example, in the bean config editor (and throughout Eclipse), you can use camel case when typing bean names. This provides the ability to enter the class name without having to know the full package or spelling of the bean.
For example:
If you want to configure JmsTemplate, type <bean class="JT"/> and press CTRL-Space after the "T" to get a long list of beans matching J and T. Narrow by <bean class="JmT"/> then press CTRL-Space after the "T" to get a shorter list where you can choose JmsTemplate. The complete package and classname is entered for you.
When configuring properties of a bean, content assist provides you with the available properties that you can set in the XML config.
<bean id="jmsTemplate" class="…JmsTemplate"> <property name=""/> </bean>
By hitting CTRL-Space within the quotes of the property name, you are prompted with all of the properties available to set.
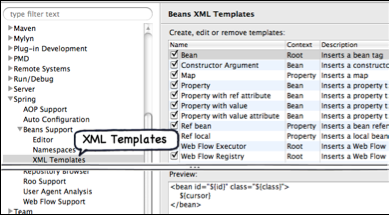
Spring also provides XML templates to quickly insert config within the xml files. For example, on a blank line in the bean config editor, type "bean" and press CTRL-Space.
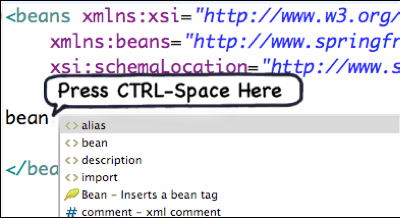
Choose Bean - Inserts a Bean Tag and below shows the example of what will be inserted into the code:
<bean id="id" class="class">
</bean>

View, add or modify XML bean templates in Preferences > Spring > Beans Support > XML Templates
Bean Editor Tabs
A series of Tabs will display at the bottom of the editor based on the content of the XML namespaces used. Overview tabs for specific namespaces include JDBC, Spring Integration, Spring Batch and Web Flow.
![]()
- Source – The XML editor
- Namespaces - Choose namespaces to include/exclude in the configuration file, without the risk of typos.
- Configure the namespace discovery in Preferences > Spring > Beans Support > Namespaces
- Overview - General overview of the beans within a bean definition file. A tree hierarchy shows the beans, nested beans and bean properties.
- Namespace specific tabs – provide bean information for namespaces we have selected. Such as: context, jee, tx, etc.
Beans Graph – Display's graphical representation of beans (see Visualizers below)

<Configure the namespace discovery by selecting Preferences > Spring > Beans Support > Namespaces.
Section 5
Validation
Spring project validation rules are available in Preferences > Spring > Project Validators section.
Spring Validator
There is only one option to verify Spring is in the class path. This validator is disabled by default. There are three categories: Bean validation, STS validation, and Spring validation.
Bean Validation
There are 15 rules available, most enabled by default. These rules validate bean names, aliases, deprecation, @Required annotation, constructor injection, and Autowired annotation types (@Autowired, @Resource, @EJB).
| Bean Rule | Description |
| Required Property | Validates @Required annotation |
| Annotation-based Auto wiring | Validates @Autowired, @Resource and @EJB annotations |
| Bean Alias | Validates alias names associated with bean |
| Bean Class | Validates a bean class |
| Bean Constructor Argument | Validates non-abstract bean's constructor arguments |
| Bean Definition Holder | Validates Root bean's name and aliases |
| Bean Definition | Validates a bean's definition |
| Bean Deprecation | Validates init, destroy and setters are not deprecated |
| Bean Factory | Validates a factory beans and factory methods |
| Bean Init and Destroy Method | Validates non-factory beans init and destroy method |
| Bean Method Override | Validates bean method override |
| Bean Property | Validates bean's property accessor method is in bean class |
| Bean Reference | Validates bean references depends-on attribute, a value holder or collection type |
| XML Parsing Problems | Validates XML file is parseaable |
| XSD Tool Annotation | Validates attributes based on schema |
STS Validator
The eight STS validator options are project-wide validation rules.
These validators are disabled by default.
| STS Rule | Description |
| Driver Manager Data Source | Validates the project does not use this class |
| Bean Inheritance | Recommends bean inheritance for simplification |
| Import Elements at Top | Recommends imports before other bean definitions |
| Parent Beans not Abstract | Validates that parent beans are not abstract |
| Too Many Beans | Validates too many beans in file – approx. 80 beans |
| Unnecessary Ref | Check for ref elements and recommends ref attribute instead. <property … ref=""/> instead of <property …><ref bean=""/></property> |
| Dedicated Namespace Syntax | Checks for cases where dedicated namespaces can be used |
Once enabled, from Package Explorer view, R-Click on the project and select validate.
STS Validation errors will be displayed in the Markers and Problems views.
Once corrected actions are made, you may need to remove the validation markers. R-Click on project > Spring Tools > Remove Validation Markers and then validate again.
Bean Refactoring
The Bean Config editor provides the ability to refactor bean definitions. In the editor, right-click on a bean definition, select "Refactor…" and you will see three options:
- Refactor Property Element – Nested ref and value tags.
- Move Bean Element (class)… - Move class to another package.
- Rename Bean Element (id, class, property name)…- Rename bean id, can search for literal string references and similarly named classes.
Section 6
Bean Navigation & Analysis
Within STS, you can quickly open a bean or view bean cross references or bean outline from the Eclipse Search and Navigate menu options.
Finding Spring Beans
From Search > Beans, you can conduct a wildcard search for beans by name, class, property name, beans referencing, and child beans.
Navigate > Open Spring Bean displays a search box where you can search for class names using camel-case.
Beans Quick Cross References
Within the bean config editor, select Navigate > Beans Quick Cross References to show the beans cross references for the current bean file. From here, you can jump to the bean declaration.
Note:
- Beans Cross References view is for Spring
- Cross References view is for AspectJ
Beans Quick Outline
Within the bean config editor, select Navigate > Beans Quick Outline to display an outline list of all bean declarations and property settings. You can search for a specific bean by ID and click a bean to see its definition.
Beans Cross References View
This view shows cross references based on the open file. By default, this view is empty until you click the "Link with Editor" in the title bar of the view (gold arrows).

Section 7
Spring Aspect Oriented Programming (AOP)
Spring AOP support in STS is extends the installed AspectJ Development Tools (AJDT) plug-in.
Spring Aspects Tooling
Spring AOP support in STS extends the installed AspectJ Development Tools (AJDT) plug-in.
Right-click on a project. Under Spring Tools, there is an option to enable Spring Aspects Tooling. This enables AJDT weaving features within a project.
With this setting, AJDT weaves itself into JDT with features:
- TD-aware reconciling/eager parsing
- TD-aware content assist
- TD-aware type hierarchies
- Search for aspect elements using standard Java search and Open Java type
Source: http://wiki.eclipse.org/JDT_weaving_features
AOP Event Trace
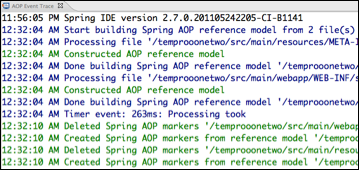
The AOP Event Trace view provides log-like detail during a project build. The view logs information about the Spring IDE's internal AOP model creation.
To enable this feature:
- Add spring-aspects.jar to the project.
- Right-click project > Spring Tools > Enable Spring Aspects Tooling.
- Select Preferences > AspectJ Compiler > Other > Check Verbose & Pointcut matching timers.
Spring Pointcut Matches
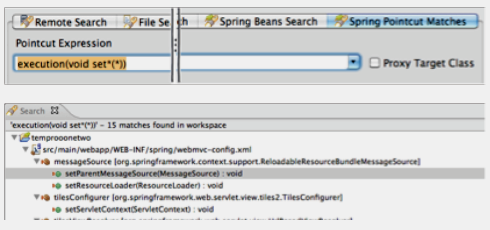
From the Search menu, we can use Spring AOP Pointcut expressions and test point cuts such as:
execution(void set*(*))
bean(transactionManager)
Section 8
Visualizers
STS provides the ability to graphically view and edit Spring configuration. The five visualizers are beans, Spring Integration, Spring Batch, Web Flow, and Aspects.
Beans Graph
The Beans Graph provides a visual diagram of the Beans and Bean Relationships within a config file or config set.
The Beans Graph provides a visual diagram of the Beans and Bean Relationships within a config file or config set.
Within a Bean Config file, the tab "Beans Graph" displays beans within the file.
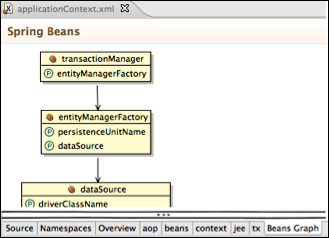
From Project Explorer, expand the project under Spring Elements, right-click the Config Set name, and choose "Open Dependency Graph".
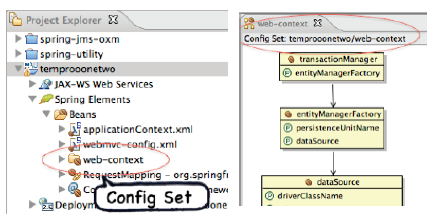
Set preferences for Beans Graph in Preferences > Spring > Beans Support
- Display Inner Beans
- Display Infrastructure Beans
- Display Extended Content (Autowired beans)
This feature is enabled by default in Preferences > Spring> Beans Support > Editor > Enable embedded graph pages.
Integration Graph
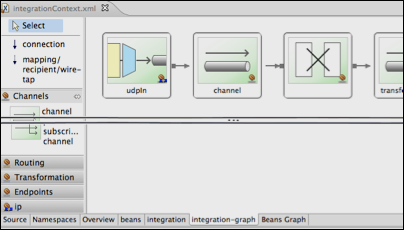
When using Spring Integration, the "integration-graph" tab is available in the beans config editor. The graph displays the standard Hohpe/Woolf diagrams from the Enterprise Integration Patterns book.
When using Spring Integration, the "integration-graph" tab is available in the beans config editor. The graph displays the standard Hohpe/Woolf diagrams from the Enterprise Integration Patterns book.
This visualizer is editable using the tool pallet on the left. The tool pallet only shows tools based on the namespaces included in the XML file.
Batch Graph
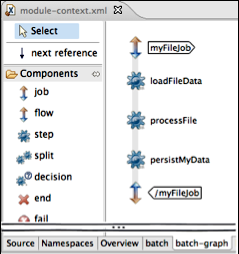
When using Spring Batch, you see the batch-graph tab in the beans config editor. This visualizer is editable.
Web Flow Graph
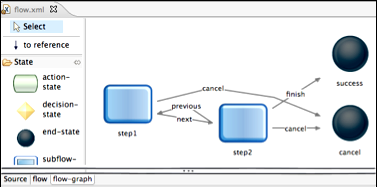
Spring Web Flow provides you with the ability to design Stateful page flows. The bean config editor provides the ability to edit the flows in XML or visually from the flow-graph tab.
Aspect Visualization
To see visualize Spring AOP aspects, select Preferences > Visualizer under Visualizers and then check Spring AOP Provider. You can also do this from the Visualizer view by clicking the down arrow in the view's title bar and choosing preferences.
In the view tools, select the "Hide Unaffected Bars" to show only the classes affected by aspects.
Note: You do not need to enable Spring aspects tooling for this feature to work.

Using Spring Tool Suite to Write a Web Flow Program
Source: https://dzone.com/refcardz/eclipse-tools-spring
0 Response to "Using Spring Tool Suite to Write a Web Flow Program"
Enregistrer un commentaire